Cosplays Aplenty

Lately I’ve decided that I will be doing blog posts for The Elven Padawan primarily on Saturdays. In the past I’ve done them rather sporadically and with no real pattern, pretty much just whenever the mood struck. But that’s not fair to all you guys, since you never know when a new post might pop up. Now it’ll be much easier for you to plan for them and you’ll be expecting them when they do happen.

Now don’t worry, news announcements will stay the same they’ve always been: I get them out to you as soon as I find them myself. So if there’s a new trailer, title reveal, news announcement, or anything along those lines, it’ll show up on here as soon as I can get it out.

It’s just the posts for The Elven Padawan Blog (like the cosplay breakdowns and craft tutorials, my own theories and rants [like that thing about Ahsoka I did last week]) that are changing a bit.

So for this week, here’s the first post in this new arrangement: a brief rundown on all the cosplay projects I’ve done so far. A few I’ve talked about it even detailed extensively on here (like my Thrawn one), but I’ve had a couple requests for pictures of my Rey cosplay, so I decided to put them all on here.

I hope you enjoy!! 😀


1. Rey the Desert Scavenger

This was the first full-on “cosplay” attempt I had ever done, and I’m still doing some work on it. Rey’s full Desert Scavenger ensemble is one that can be worked on slowly for a very long time, especially if you’re trying to get all the pieces authentic and screen-accurate. So far I’ve got the actual clothing pieces out the outfit (shirt, pants, body wraps, arm bindings, boots, belt, and wristband), along with the turban-style headwrap she’s wearing while scavenging at the very beginning of TFA, her staff, and a weathered olive/brown canvas backpack that I’m using until I can find something better. (Hey, it was a couple dollars at Good-Will, already wonderfully weathered, and looks great with the rest of the outfit!!)

I’ve been wanting to get pictures of this one for a while, so when the weather was nice out I threw the outfit on and roped my little sister into helping me snap some. I didn’t have time to do the full Rey hairstyle, and since I hadn’t planned for this photoshoot, I didn’t do the makeup either. But I got some really great shots of the full outfit and the staff, and decided to share them with all of you here.

IMG_5330

IMG_5329.JPG

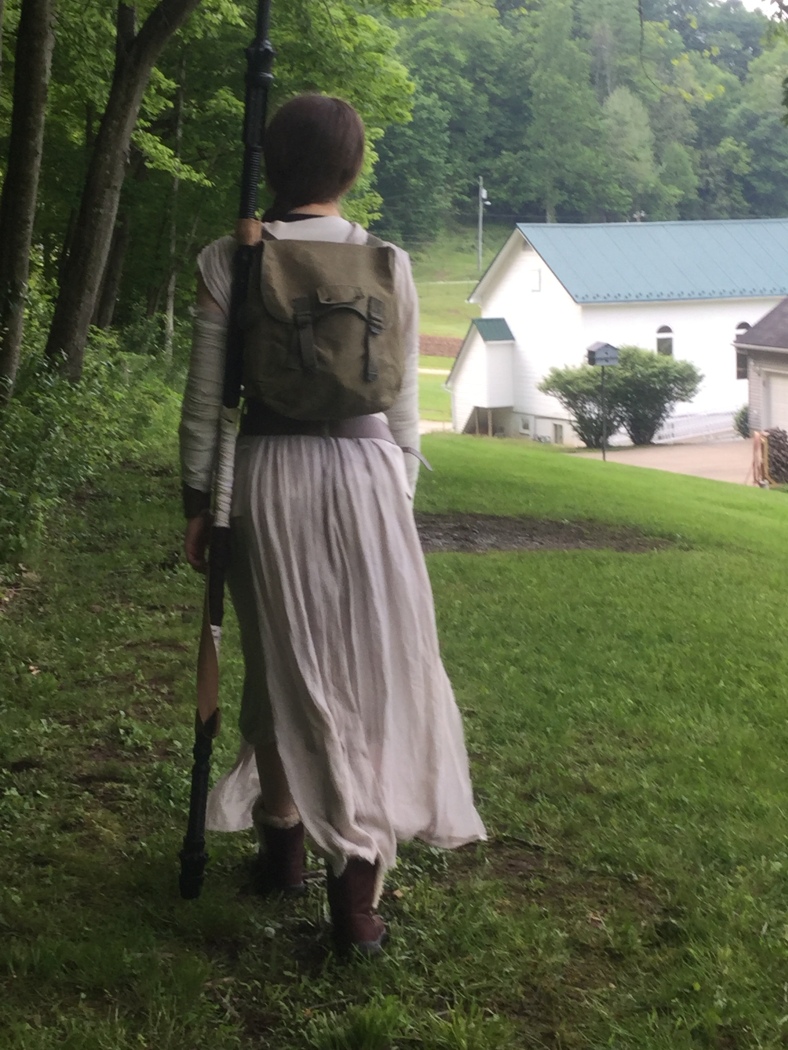
This one is just so much fun!! Sadly, I have yet to actually wear it “in public”…we’re working on that one…😉

Besides trying to hunt down a good replica for the small pouch Rey wears at her hip, and doing some alterations on the boots so they’re more screen-accurate, I also eventually want to remake the wristband and belt from real leather. I’ve already hunted down a really nice 3D-printed replica of Rey’s blaster, which will be at the top of the list come my next birthday.

And just a word on that staff: I totally love it!! 😀 I made it all myself from bits of hardware and an online tutorial. I went ahead and used a metal pole for the base, instead of a lighter PVC pipe, and I’m glad I did. It adds enough weight to the staff to make it really seem authentic, and somehow that really makes getting into character so much easier and more fun! I seriously do think I could knock someone out with that thing (not that I’ve ever actually tried….😉😆) There is a slight drawback to the extra weight however, and that’s that you have to be careful not to accidentally wack a wall, door frame, or another person with it. (Once again about the “knocking out” part.)


2. Grand Admiral Thrawn

Most of you have already heard all about this one, but for those who haven’t here’s a brief overview.

I wanted to go full-out for May the 4th this year. I was debating between several different outfits, one being the Rey one above, but what kept standing out in the front of my mind was a genderswapped version of Director Krennic, from Rogue One. I would switch the tunic and pants out for a knee-length dress and leggings, keeping intact the sweeping white cape, rank badge, boots, and other little details that make Imperial officers stand out. But I also really, really wanted to do alot of makeup work for my outfit this year, particularly attempting to paint all my exposed skin a color that would be considered outside of normal. That’s when the idea hit me: genderswapped Grand Admiral Thrawn. Season 3 of Star Wars: Rebels had just ended, and I had been totally in awe of his tactical genius, always-in-control way of doing everything, weirdly calm and unsettlingly relaxing voice – let’s just face it, the guy’s awesome!! Not to mention he’s one of the only nonhumans in all of the Empire!! It was totally the right choice to bring him back to Star Wars canon.

And so was born my epic genderswapped Thrawn cosplay!!

IMG_5164

(I’m planning to add some of those awesome red contacts as soon as I get the funds and an equally awesome place to show them off.)

But wait!! Here’s a special surprise that none of you have seen.

I have just obtained special permission to share this bit of intel with you: Thrawn was not alone that day! There was another Imperial by his- um, her side…

IMG_5130.JPG

Thats right, my sister cosplayed as Governer Ahrinda Pryce!! It was sooo awesome!! Though it will probably never happen again, since she’s not nearly into all the cosplay stuff as I am. She’s more of the collector, with a room full on LEGOs, lightsabers and other props, and the beginnings of our new Funko POP! collection. (Seriously, y’all don’t know how hard it was to convince her to let me share this photo; she gets really funny about actually wearing her costumes out in public or showing them to other people.)
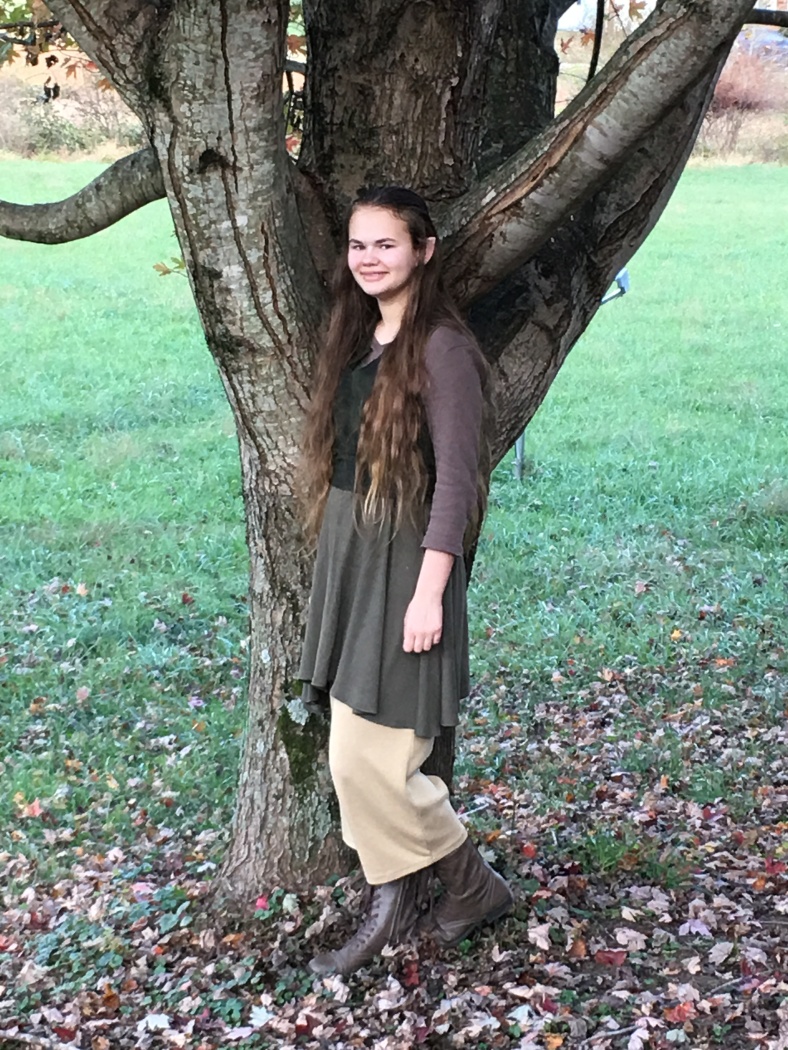
 

3. Elven Jedi Cloak

Ok, so this one isn’t actually a full cosplay yet. Actually, it’s more like outfit that I Plan to use as I component for a future cosplay. (Possibly an Old Republic-reminiscent, Elf-based-Jedi mashup type outfit. Or an Elven warrior from The Berinfell Prophecies book series that I love so much!)

This started out as Arwen’s Chase Dress from The Lord of the Rings: The Fellowship of the Ring. But when I went to cut out the pieces from the fabric I had found, I realized there wasn’t going to be enough. Since all the main body pieces, plus the pieces for the high rolled collar and drape-y lowers parts of the sleeves were cut out, I simply improvised and ran with it. I used the fabric from those lower sleeves and collar pieces to make an enourmous hood, trimmed the hem a bit so it was even all the way around, and left the sleeves off entirely. Then I sewed the pieces together, top-stitching zigzags over all the front bodice seams and surging all the raw edges so I wouldn’t have to hem them. I also left the front open entirely, all the way down, then added metal eyelets to the edges so I could secure top closed with leather lacing. The skirt is split, just like Arwen’s in the original design, so it can function wonderfully as either a cloak or overdress, leaving the wearer the full ability to ride a horse or swing a saber.


(And yes, that is the dog who was barking in the background of my last podcast episode.)

4. Closet Mirkwood Elf

This one was more of a “closet cosplay” that I threw together in a couple afternoons for a small Fall Festival we were doing with some friends a little while back.

I used a short green dress I already had, along with some brown gaucho-things I had drawn out a pattern for, and a pair of short boots.  I also whipped up some “leather armor” to finish the look: a cuirass and pair of arm bracers. (I made the “armor” out of scrap fabric I had lying around. I saturated each piece in regular spray paint, which stiffened the fabric, made it all about the same color (since the cuirass was made from yellow cotton fabric and the bracers from brown flannel), and actually gave it a rather leathery look.)

I put on my latex elf ears from Aradani Studios (which I absolutely love, btw!) and left my hair down.

IMG_4248.JPG

5. BONUS!! Kylo Ren and the Jawas

*fangirl sidetrack: would that be the greatest band name ever?! 😆

Ok, so this one’s a bonus. These are the costumes I made for my younger sisters for May the 4th last year. The one closest to my age (who did Pryce this year) wanted to try out Kylo Ren, and the other two were a couple of anonymous Jawas. I also made all their costumes, except for Kylo’s mask and saber, which we ordered from the illustrious and ever-intriguing Amazon.

IMG_3652.JPG

So that’s it for this week’s post from The Elven Padawan blog!! I hope you all enjoyed this, and there’ll be another post next week.

Please let me know what you think it the comments! I’d love to hear about any costumes, or really any other projects, that you’ve done!! 😊


This article was written by Shay S., Creator, Chief Editor, and Podcast Host for The Elven Padawan, and first appeared on ElvenPadawan.com

Grand Admiral Thrawn cosplay, part 3

This is the last in a series of posts detailing the construction of my genderswapped Imperial Grand Admiral Thrawn cosplay.

You can find the beginning of the series here.

You can find part 1 of the tutorial right here.

You can find part 2 of the tutorial right here.

Welcome to the final installment of my series on my genderswapped Grand Admiral Thrawn cosplay!

I know I said that I wanted to get this post out Thursday, on May the 4th. Well, obviously that didn’t turn out too well, since I’m posting it now, two days late. My apologies for that little slip.

To make up for the wait (and because I’m just so excited with how this turned out,) I’ll go ahead and give you some pictures now, instead of making you wait to the end of this post!! 😀

Ready??

*starts up the Star Wars main theme*

Sure you’re ready???

Ok, here it comes…..

Ta Da!!!!

IMG_5164.JPG

And here’s another one of me and my friend at the “May the 4th Be With You” party where I debuted the cosplay.

20170504_123244.jpg

Yes, I know that smile looks extremely un-Thrawnish…

Yes yes yes, isn’t it awesome?! 😀 I love how it all turned out, especially the makeup!!! I had serious doubts about that part, since I’ve never really done any makeup stuff before, especially not like what this called for! But it actually turned out to be much easier than I thought, especially with the help of a really awesome tutorial video I’ll have below.

And it was just so much fun!! I am totally doing this outfit again some time, and I also plan to do more with makeup like this. There’s just something distinctly thrilling about painting yourself up to have an entirely different skin color and face shape that nothing else can match! (One outfit I’ve really got my eye on right now is Naare, from the LEGO Star Wars: The Freemaker Adventures series. Seriously. I really do want to cosplay as a LEGO figure. She’s just got a really neat Jedi-based outfit, and I’ve yet to see anyone else who’s attempted it.)

On to the details of how I finished off this project!


Now that I had the whole costume assembled, it was time to start on the makeup part.

One very obvious and distinctive thing about Thrawn is his cool blue skin, red eyes, and blue-black hair that distinguishes him as a member of the Chiss race. That’s also one of the things that makes him such a captivating character: within the extremely human-elitist minded Empire, he the only known non-human officer of substantial rank. So it just wouldn’t work at all to cosplay this character and even think of leaving out these details.

I really wish I could’ve gotten some contact lenses to recreate those red eyes before the 4th, but with my budget and time constraints, it wasn’t going to happen. In the end it turned out fine, since the red slashes on my lower eyelids helped to distract from how un-red my eyes were. However, I discovered that having blue skin really brings out the green in my eyes. And while any other time I would be delighted, since I’m always trying to find techniques to make them look greener (because Tauriel and Rey, people! and besides, why not?) it just didn’t quite help out my Thrawn look.

I was set, however, on at least getting the skin and face details right.

I had already done a little bit of searching, and had decided on a light blue costume makeup from Mehron. Here’s the exact product I ordered from Amazon: Mehron Makeup Paradise Makeup AQ Face & Body Paint (40 gm) (LIGHT BLUE)

I went back and forth a little bit on whether I should go with a darker shade, as most people who replicate this look do. However, since I was going with the Rebels version of Thrawn, and his skin color there is closer to an ice-blue, I went ahead with the lighter shade and order it from Amazon.

In the end, I am so glad I went with the light blue!! It matched the color from Rebels very well once I put it on my skin, and by the time I had added all the shading and detailing on my face it was almost exact.


When I was first doing planning for this cosplay, I did some searches for pre-existing tutorials on how to do it all. It was odd to me that there were only a very few, and I couldn’t find any at all that had been genderswapped like I was wanting to try.

In the handful that I did find where those amazing videos I included in the first of this series, as well as a this one specifically on how to do the makeup.

This video is flat-out incredible. She recreated Thrawn’s look almost perfectly, and pays a huge amount of attention to minor details, which in the end totally sells it. By the end of the video, her subject looks completely different, even down to just his basic face shape! And even better, especially for my cosplay, was that she based her tutorial entirely off of the Rebels version of Thrawn. (And including Thrawn’s music themes from Rebels in the background was another point as well, since I already love those songs!! XD )

I used the light blue Mehron makeup as the base color, applying it with some small wedge-shaped applicator sponges from Dollar Tree, then added different shades of darker blue and black eye shadow I had found at Dollar Tree to do the shading (I love cheap stuff, can ya tell yet?) It all worked super well, and blended in to create the highlights and shadows wonderfully!

Here’s a step-by-step of the process I used, based on the video above.

Thrawn-Makeup-Progression

I apologize profusely for low quality of a few of these shots, as well as the scariness of my hair in all of them…

Once I was all done with the main makeup and had blended it together, I used a clear chap-stick as a base for my lips, then used a blue eyeliner pencil (from Dollar Tree!) to give them that blueish tint, while still keeping the more pinkish flesh-tones underneath, just like we see from the Rebels version of Thrawn.

After my face was completed, it was time to move on to hair.

This was very simple: I pulled my hair back into a loose braid towards my left shoulder, then went down the length slightly “pancaking” it to make it lay flatter and appear a bit thicker (“pancaking” means pulling out on the “elbows” of each segment of the braid, until you get it to the desired “fatness.”) Finally, I sprayed the whole thing down with a coat of first black, then dark blue, spray-in-wash-out style hair color that I found at Walmart. As you will probably see in some of these pictures, it was kinda hard to get the front coated evenly without getting it in my eyes or ruining the makeup work I had already done. Looking back, I think I’ll do my hair first next time, so that I can wash off any that bleeds onto my face or neck before moving on the to makeup.

Here is a comparison of what Thrawn actually looks like in the show and what my genderswapped version looked like once I had completed the makeup and hair…

ThrawnvsMe.jpg

It’s just not fair….Thrawn gets this awesome office with all the cool artwork in the background for his pictures, while I have to shoot mine in the bathroom…


Now it’s time to just bask in the glory of a completed project for a bit….

Ok, done basking, time to get on to the next project!!

Just kidding, I don’t think I’m quite ready to take on something this big quite yet, though I am seriously planning a couple for soon, specifically a genderswapped Bilbo, that Naare outfit I mentioned at the top, and this crazy idea of finally finishing my Tauriel dress that I bought all the stuff for and then kinda forgot about.

It’s been so much fun going through all this with you guys, my readers. You’ve all been super encouraging and enthusiastic of my progress as I posted it, bit by bit. Thanks so much for sticking with me, and I hope this series has been helpful to anyone else considering making their own version of Grand Admiral Thrawn.

Until next time, my friends!! (and that’s meant to be read in Hondo Ohnaka’s voice, by the way)

Let me know what you think, as well as about any cosplays you’ve done, in the comments!

May the Force be with you, always!!

Shay

Grand Admiral Thrawn cosplay, part 2

This is the first in a series of posts detailing the construction of my genderswapped Imperial Grand Admiral Thrawn cosplay.

You can find the beginning of the series here.

You can find part 1 of the tutorial right here.

Stay tuned for the rest over the next several weeks!

First off: yes, I am doing another post on this same cosplay project when I just did one Saturday. The reason why: I’m trying to make up for missing the week-before-last, and get this whole tutorial out by May 4th. I’ve already put together the whole outfit, and was able to find some spray-in hair color at Walmart yesterday, so all I have to add now is the makeup (I ordered it from Amazon last night and it should be here tomorrow.)

Now, on to how I made the dress for my genderswapped Grand Admiral Thrawn cosplay!!


One thing that sets Grand Admiral Thrawn apart from all his companions in the Imperial Navy is his distinct, sparkling-white uniform. The only other Imp with a similar ensemble and on-screen appearance, so far, is Orson Krennic of Rogue One. But even that Advanced Weapons Research director, with his short temper and magnificent swirling cape has quite a few differences costume-wise, besides lacking the cold-blue skin tone and chilling red eyes of Thrawn. The most noticeable of these would be the cape, but also the fact that he wears black pants with his white tunic, and is also seen occasionally wearing his cap. (But hang on for a bit, and I’ll have more about this later.)

Thrawn, on the other hand, has white for both the tunic and the pants, and seems to have shunned the cap entirely.

Now since I wanted to make a more female-based version of Thrawn’s outfit, I decided to exchange the hip-length tunic and flared pants for an A-line style dress and leggings. Yes, I know that both male and female Imperial officers wear basically the same uniform. We’ve never seen an Imperial in a dress, at least not in my knowledge of the series.

But that’s where the whole “inspired-by” part of this comes in.

It’s just so much fun to change a few things up and come out with a girl version of a male character’s outfit, even if it’s not technically very screen-accurate in some places.

Back when I first came up with the idea to try out a feminine Imperial officer “inspired-by” outfit, I hunted out a pattern for what I saw in my head, and made this sketch.

IMG_3932.JPG

As I wrote in this article, the pattern I decided to use was Simplicity #1609, view C.

Now, even though this was an “inspired-by” cosplay and wasn’t going to be screen-accurate in a couple of major ways, I still really wanted to sell the look. So I decided to try out altering the pattern a bit in order to add on that front panel that you see on the Imps’ uniforms. As you can see in the sketch above, this front panel would come all the cover the entire left shoulder, span across the entire chest, then reach 2/3 of the way across the right shoulder (the same way the double-breasted tunics worn in the actual movies do.)

IMG_4610

I managed to find the perfect white cotton fabric for this outfit in the remnant bin at my local Walmart. It wasn’t anything fancy, just a straight-up 100% cotton, but it was exactly what I was looking for. There were 3 pieces of fabric, each 2 yards long, and at less than $4 a piece, it was a deal I couldn’t pass up. The pattern only calls for about 3 yards of fabric to make the largest size, and I was making one somewhere in the middle, but I wanted plenty to allow for the extra front piece, and just in case I made a mistake.

Before anything else, I ran all the fabric through a cycle in the washing machine, as well as a low-heat cycle in the dyer. I try to always do this before I start on a sewing project, especially something wearable. Because there’s nothing worse than spending a lot of hard work and time on creating the perfect outfit, making sure you get all the seams right and the hems perfectly straight….just to have it shrink up beyond recognition on the first washing.

After washing and drying the fabric, I also ironed over it to take out the wrinkles and ensure it would all lay flat for cutting out the pieces and sewing them together. This project marked the first time I had ever sewn darts. When I first realized the pattern included those little beauties, I got pretty worried, as I had always thought of them as extremely tough to get right. But when it came down to it, I discovered that they really weren’t that bad at all. In fact, they were much simpler than I would have ever thought. So all that to say this: if you intend to replicate what I’ve done here, and want to use the same pattern that I did, don’t freak out over those darts. Just go slowly, and make sure you iron those creases before you sew them. Seriously, this will make a galaxy of difference to how hard they’ll be to get right. It also really helps to have a chalk pencil around to mark out where you’ll be creasing and sewing.

And just a quick note: if you have a different pattern that you would rather use to make the dress, or even a dress that’s already in your closet that you’d like to use for this, go for it! You could always adjust and modify some things to add that top layer to the front, or if you don’t really care to have it there, you could leave it off completely just as well and most people wouldn’t even notice. Nothing at all says that you have to do it exactly the way I did. The beauty of this craft, cosplaying, is that there are so many ways you can do these things and still have them looking fantastic. 😀

Since all the instructions and details for the dress itself are included in the packet with the pattern, and you may chose to use a different pattern than me or a pre-made dress, I’m not going to go into all the details here. I will detail how to add the front layer to make the dress “double breasted” based on the pattern that I chose (Simplicity #1609, view C), as it would be basically the same technique for any similar pattern.


Imp_Dress_front_flap_construction.jpg

As you can see from the picture in the top left corner, this is the front of the dress that I used. It’s two separate pieces, which are mirror images of each other, sewn together down down the front. In the top middle picture, #1 is what the pattern piece for the front of the dress looks like. Now since I was adding another whole flap to the front, instead of cutting two of those top front pieces, I cut three. Next, I traced the pattern out on another piece of paper (top right), and drew a line down the length of the entire piece where the flap would stop on the right side of my body. The two bottom pictures show where I drew my line, and then the completed adapted front piece.

Take a look at this picture of Ahrinda Pryce here:

governor-pryce_4cf3bde4Picture from the official Star Wars website

You can see that the top front piece comes to about half-way across her right shoulder.

Refer again back to my picture collage up top. I drew my line a little farther over, just to be safe, and to allow for a hem to be added along the edge of that piece. When you draw your line, make sure to add on an extra 1/2 inch to 1 inch along the edge to allow for this hem (my hem was almost 1/2 in. wide, but you could certainly go narrower than that if you have a better skill with hemming than I do. 🙂 )

Also, make sure that you don’t start at the shoulder and draw your line at a right angle straight down all the way to the bottom hem that way. Going back up to my picture again, notice that you have to follow the curve of the armhole a bit (especially if you’re doing a sleeveless dress like mine. that is,) and then flare it out at a steady rate as you go down so that it follows the A-line shape of the dress. And for the adapted half-piece for the right side of the dress, just leave off those darts coming in from the side entirely.

How to assemble everything with these adaptions:

Follow the instructions just like you would if you were making the dress “the normal way,” sewing the 2 regular front half-pieces so that you have a full, “normal” front panel. Also sew the adapted half-piece to that last regular front half-piece, so that you have that 3/4 across, adapted front panel.

Sew the back according to the instructions.

When you get to the point where it’s time to sew the shoulder seams, attaching the front and back pieces together, stack the two front panels that you have (adapted one on the bottom, or with its right-side together against the right-side of the back panel) and pretend that both of them together are the front panel. Now sew the shoulder seams according to the instructions.

Continue on sewing the dress according to the instructions until you’re finished.

When you turn the dress right-side-out, the adapted front panel will be on the outside, the “regular” front panel underneath.

Just like this!IMG_4826.JPG


Yes, I know, this is turning into one monstrosity of an article, but I still have a bit more to go!! Now that I’ve shown how to add that top layer to the front of your dress, it’s time to show how I put all the pieces together!

Epaulets&Badge_attachment_details.jpg

1. You’ll need a pack of hook-and-eye fasteners, with straight style eyes, to attach the epaulets to the shoulders of the dress. 2. The hook part will go on the epaulets, and the eye part on the dress itself. 3. Glue the hooks to the short ends of each epaulet (with the hooks facing inward as shown.) 4. The epaulets attach right to the dress, and you can’t even see the metal fasteners! 5. See how nice it looks once they’re attached? 6. You’ll need two corresponding strips of velcro (one of the “hook” side, one of the “loop” side) to attach the rank badge to the front of the dress. 7. Hot glue one strip to the back of the rank badge. 8. Sew the other strip to the front of the dress, exactly where you want the badge to be positioned. 9. Now the epaulets and rank badge are all read to go! (And yes, I do know that I stuck the rank badge on upside down that time.)

To attach the rank badge and epaulets to dress itself, you’ll need velcro and some metal hook-and-eye style fasteners. The velcro you will use for the rank badge, and the hook-and-eye fasteners for the epaulets. Since the epaulets sit on the top of the shoulders of the dress, and you don’t want people to be able to see hooks that attach them to it, you’ll need to get a pack with straight eyes, not the rounded ones (the pack I grabbed at Joann Fabric’s had several of both kinds.)

As you can see in the note I wrote myself in picture #2, you’ll put the hook part on the epaulets, and sew the “loop” (eye) part straight to the shoulders of the dress. I would advise slipping the dress on and holding the epaulets on your shoulders to decide where exactly you want them to sit, then mark where you’ll sew the eyes based on this. While you’re doing this, you could try to shape them a bit as well, so they’re a little more rounded and lay against the curve of the top of your shoulders better (just make sure not to crease the plastic when you’re doing this.) I did this throughout the process and it worked out really well.

Using hot glue, I attached one hook to each short end on each of the epaulets as shown in picture #3 above. It can take a couple of tries to get them to stay on solidly, as you don’t want them to pop lose under the pressure of being attached to the dress. Then I sewed the eyes to the shoulders of the dress based on the marks I made earlier. Now the epaulets are firmly attached to the shoulders of the dress, and can be attached and detached with ease!

Attaching the rank badge was also extremely simple. I used hot glue to attach a strip of velcro to the back of the rank badge, then sewed the corresponding strip directly to the dress itself. I positioned the badge to the center-right of my chest based on pictures of I had of Thrawn and other Imperial officers. Now the rank badge can also be put on and taken off in a matter of seconds! (Note: I went back and added another strip of vecro to both the badge and the dress underneath the first one for added stability and to hold it closer to the dress; it was hanging off a bit, and didn’t look quite right. After adding the extra piece though, it looked perfect!)

The belt I showed you how to make in the last post is already finished and read to wear, so you don’t have to do a thing more to that part.

Now all that’s left is to hunt out some white leggings and tall black boots.

These are the times when I thank God for a place called….Goodwill! That’s right, that and other thrift stores can be one of the best resources out there to cosplayers like myself. After grabbing a pair of opaque white leggings/tights from Walmart, I headed over to a large Goodwill near me to look for some boots.

Lo and behold, right there in the shoes section were the perfect knee-high black boots! I was extremely happy with my find, and they fit very well (along with having no heel, which is always a bonus for a tall, not-so-well-coordinated girl like me. 😉 ) They even have silver studs running down the entire length of the boot, which lends itself wonderfully to the inspired-by look I’ve been working towards with this outfit.

And now, because you have been so patient and read through all this boring stuff….here’s a sneakpeak at the costume so far!

IMG_4919 (3).JPG

Isn’t it awesome?! I’m so excited with how it has turned out so far!!

I’ll post the last part of this series on May the 4th, and that’s when you can see the complete outfit, makeup and all! I can’t wait!!!

Until then, let me know what you think in the comments below! I always love to hear from my readers!! 😀


This article was written by Shay S., Creator, Chief Editor, and Podcast Host for The Elven Padawan, and first appeared on ElvenPadawan.com

A Cosplay of “Grand” Proportions


IMG_4593

A random clutter of some of my geek creations and works-in-progress, including: a Rey staff, two patterns for Elf dresses, a Jawa hood, green suede for a soon-coming Tauriel cosplay, a red dress for an Ahsoka inspired-by outfit, my Rebel Alliance purse, elf ears, a Sabine Wren jacket I made for my sister’s birthday, a random scrap of Star Wars print fabric, a pattern for an Imperial officer rank badge, cloth for Imperial officer-inspired dresses, a Nerf gun painted to look like a Scout Pistol, the Evenstar necklace, yarn for a hat based off Sabine Wren’s hair, the belt from my Rey costume, a Rebel “Hope” shirt I made, and a jumble of other sewing and crafts supplies.

Something people need to know about me is that I’m a geek. If you’ve listened to the podcast, or even if you’re just looking at this site, you know that already. It’s pretty hard to miss.

But here’s something else: I’m a crafty geek. I love to make stuff, generally un-needed mathoms that clutter up the house and make everyone else who lives here want to pull their hair out. I’ve definitely got some hobbit genes in me somewhere.

And it just got worse. Much worse.

See, there’s this thing out there floating about the galaxy. A thing that no one ever should have let me find out about. Seriously, it should have had a tag that says “Never let Shay come in contact with this!” put on it, then been locked up in that government warehouse where they put Indy’s slightly more unsettling discoveries.

What, you may be thinking, could this thing possibly be?

Well, it’s this little thing called….

COSPLAY!!!

Yes, yes, yes, it’s AWESOMENESS!!!

I already love to put together “inspired-by outfits”, like a green dress with brown leggings and my hair in Elf braids when I’m in a Tauriel mood. So of course cosplay was just for me. And now it just adds to the clutter of other geeky crafts I make.


So.

When I first started this blog, I told you guys that there would be craft and cosplay tutorials. And I’m about to make good on that offer. Because I have a very awesome cosplay project that I’m currently working on to share with you.

A very grand cosplay.

Can you guess what it could possibly be?


Introducing….

My very own, original, make-it-up-as-I-go-along….

Grand Admiral Thrawn cosplay!!!

But here’s what makes it even better.

Remember when I said I already loved inspired-by looks?

Wellll….I’m genderswapping it.

So in other words, it’s a female version of Grand Admiral Thrawn’s uniform, complete with a dress and leggings in exchange for the standard Imperial tunic and pants.

IMG_4604 (2).JPG

The pattern I’ll be using for the dress/tunic part of the outfit.

Oh yes. Oh yes, I am doing this. And I am so excited to get it finished, I seriously can not wait!!

Grand Admiral Thrawn has become one of my favorite bad guys of all time just since his re-introduction to Star Wars canon though Star Wars: Rebels. I love how he completely defies the typical stereotype of loud, crashing, sharp-voiced, all brawn, no brains Imperial officers. He’s quiet, refined, and polite, but behind his glowing crimson eyes is a mind that’s razor sharp, always gathering evidence to support his theories, and analyzing your every move. He sees the world as an immense game of chess, and he always seems to be one step ahead of the Rebels in everything they do. Not to mention his almost creepy obsession with art. And he’s Chiss! Probably the only high-ranking Imperial of non-human descent in canon.

Now don’t get me wrong. In any other case, I’m all Rebel. I have the Rebel Alliance symbol proudly appliqued to my purse and always by my side. My homemade “Rebel Hope” T-shirts are some of my favorite wearables that I own. I love that bright orange that you can always find someplace in there, like on Ezra’s jackets, Luke’s jumpsuit, and Poe’s X-Wing (ok, yeah, he’s technically Resistance, but it’s close enough for this example.) In most circumstances, I just like the good guys.

But when it comes to Thrawn (or Loki), I just have to bring out the bad girl side for a little bit.

Fangirl rant done for now, this post serves as the official start of my genderswapped Grand Admiral Thrawn cosplay tutorial. Over the course of the next several weeks I’ll add updates and the next parts of the tutorial as May the 4th draws nearer (cause I’m making this outfit to wear for Star Wars Day; why else?)

Here’s a little teaser to hold you over for the next part:

IMG_4630.JPG

My set-up while making the rank badge, belt buckle, and epaulets (while I listened to a loop of music from all 3 seasons of Rebels.)


This article was written by Shay S., Creator, Chief Editor, and Podcast Host for The Elven Padawan, and first appeared on ElvenPadawan.com